Hey everyone! I am starting to make some cards for an upcoming swap and I needed to reload my ATG (Adhesive Transfer Gun). This thing makes quick and easy work of applying adhesive - like a tombow on steriods :) Anyway, every time I need to reload the darn thing, I have to go surfing for a how to video. I found this great one and decided to link it here so you can check it out if you'd like. It's also in my Really Cool Video Tutorials link on the right hand side of the page. Now in a month or so when I have to reload again, I'll know where to find the directions. Have fun today!
Tuesday, April 29, 2008
Monday, April 28, 2008
memories in polka dots
 Here's one for today. I finally finished both jobs, sorting 2 large orders, and walking on my treadmill. The walking is paying off - today at "weigh-in" I was down 4.5 lbs from last week, so I rewarded myself with 1/2 hr of stamping time before my boys get home from hockey. I learned today that a friend lost her dad over the weekend. I don't keep sympathy cards on hand as I really don't like making them. This is what emerged today. I wish I could explain how or why cards happen, but I don't know when I sit down what I plan to do. I knew I wanted to use my new polka dot background, but it didn't seem very masculine, so that's where the color scheme came from. Anyway, it's something to post today and I think she'll appreciate the thought. Thanks for stopping in today - hope you all had a good weekend.
Friday, April 25, 2008
A little birdie told me...
To get my butt in gear and stamp something... anything!
Here's what emerged from my scrap pile using one of my favorite sets - a little birdie told me. Notice the scalloped edge made with my retired corner rounder (see tutorial below if you don't know how to do this). Thanks for stopping in today! Anyone got any great plans for the weekend?

Thursday, April 24, 2008
River Rock rocks!!


What do you get when you open your eyes at the grocery store instead of pushing that cart through the isles like a mom zombie - a great little alterable!! I found this little candle tin in a clearance bin and thought it would be cute (and easy) to alter. I had all my river rock stuff out for stamp camp this weekend so I cut some pieces and adhered them to my tin using red line tape! Viola - a cute little tin that matches my gift bag purse and wallet below. Thanks for looking:)
Did you know?
That Stampin Up! now allows us demonstrators to take credit cards from you as a form of payment - whoo hoo! If you would like the form to sign so that I can keep your credit card info on file to use for email orders, just remind me next time we get together and I'll get you the form.
There will be new specials coming up for May - I'll post those soon. For now, we still have the Free Wheelin' Promotion, the Wild Wasabi paper promotion and the extra hostess benefits promotion going on. If you'd like to take advantage of any of these great deals, just give me a shout before April 30th! Click on the Stampin' Up! Specials link on the top right hand side for more information on any of the current specials.
Also, I haven't forgotten you all - just been busy. As I am trying to get back into shape, I find myself not sitting in front of the computer or even at my stamp desk as much. I will be finishing up preperations for Saturdays's stamp camp today and hope to get something stamped before heading off to work later. Just wanted to say hello! Be back soon!
Sunday, April 20, 2008
tab punch circle tutorial
Here's how to get a perfect circle (that the scallop fits into) with your tab punch:
1. Punch out a tab with your tab punch fairly close to the edge of a piece of paper. (save your punched shape to use on another project)
2. Now turn your punch 90 degrees and line up with the previously punched tab to make a circle (the third picture is a close up of how to line it up)
3. You're done! Layer your circle over coordinating paper and insert a punched scallop into the middle if you'd like... Easy as 1,2,3 - give it a try and let me know what you think!


Here's a quick 4 x 4 card I made using this technique:

Saturday, April 19, 2008
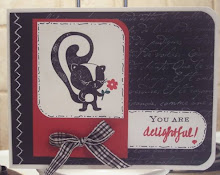
shrunk skunk - shrinky dink stamping
LOL! I picked up this black shrinky dink film (Yes, I think that's the technical name) not knowing what I would do with it, but I figured sooner or later, inspiration would hit. BAM! black, white, skunk! This is the adorable little skunk from one of my new the sets called PUN FUN from Stampin Up! All I did was rough up the black film with my sanding block and stamp the image and sentiment in Whispher White and then fill in his "stripes" with the signo gel pen. As you can see from the stamp, I seperated the sentiment from the image and mounted it on the side of the stamp. It says "I stink you're sweet". The card size is 3 x 3 - perfect for a little thank you. Thanks for stopping by today... I stink you're sweet for doing so :)
My new goodies and a purse and wallet
 Here's a quick picture of my new goodies... these are the sets I chose for my Sale-A-Bration rewards. Thank you all for helping me reach my goal of 4 stamp sets - you guys are the best!Can't wait to come up with some great projects using them to share with you all! Pictured in the --bottom left is Frames with a Flourish
--bottom right is All Scallops (which is supposed to cooridnate with a new SU! punch coming out in August)
--middle is Pun Fun (the sentiments are mounted on the sides)
--Top right is Define your Life (this is a double mounted set with just the word on the side of the block).
Now just need to find time to play with them!
I need to get organized for Stamp Camp this saturday and so I made another purse and wallet, so I could type up directions for my guests! Here's the ones I made today with retired SU! double sided paper called uptown - I love how funky this looks. I think I'll use it for my niece (the rockstar's) birthday in June. Thanks for stopping by on this beautiful CNY day... better get my butt outside before DH and the kids get home and think I'm crazy for being inside....
Friday, April 18, 2008
 Isn't she the sweetest DIVA ever.... this was Denise's month to be hostess and this is the snack she brought!! It tasted just as good as it looked too:) Thanks Denise.
Here's the full card we did as a group. The tech cards are down a few posts. The girls seemed to like it and even I was surprised that the bleach turned the rose red paper into an exact match for so saffron. The heart from always was embossed, then painted in with bleach. Once the bleach was dry, the rose red paper magically turned so saffron. The sentiment was stamped in rose red first and then just the word wonderful was "written" over with the fine tip of the black marker. TIP: When painting with bleach, use a bleach pen as it's a gel formula and easier to control than regular splashy bleach.
Scalloped Edge with Corner Rounder Tutorial
I did it... my first tutorial!!! I know, you've probably already done this, but I wanted to start simple just to see if I could do it and as it was this was like the 5th take LOL! Anyway, hope you enjoy and learn from my first video tutorial. Hey, if you like it - who know what you'll see next :)
Thursday, April 17, 2008
sassy suzie takes on a challenge

Good Morning Gals! Today's card is from the Card Sketch challenge on Splitcoast. These challenges are really fun and a great way to get your creative juices flowing - anyone can play... give it a try!
I've finally started walking on my treadmill again and I'm feeling more like my old sassy self alrready, which is why I chose Suzie today :) I also wanted to play with my new coluzzle and cut some ovals for my main image. I really think I'm gonna love this thing - I just need to conquer my fear of that fist nick in the channel - it's gonna happen and I just have to get over it. But, so far, so good no nicks yet!! One cool thing about this card that you can't see (hopefully) is that the pomegranate mat under all the river rock paper is the piece that I had used to cut the Oval mat under suzie.... Have a sassy day!
Wednesday, April 16, 2008
coluzzle templates all pimped out

I finally bit the bullet and ordered the coluzzle templates from Stampin Up! I love to use circles and ovals, but wasn't able to demo them, so I figured I'd give these things a try. I LOVE 'Em! I thought it might be difficult to cut with them, but just as long as you keep the blade straight up and down and sink it into that foam mat that comes with them - they cut like butter! They come just plain 'ol see through acrylic, but there is a small space where you pick up the blade and continue on to the bottom half... sometimes it was tricky to get your knife back into the correct grove. I'm sure it's been done before, but it's new to me - I took colored sharpies and colored the whole circle/oval one color so I can say when I demo these to cut one "orange sized" circle... that won't confuse people to much now will it :) Anyway, with the kids home from school, I haven't had much time to create, but I still like to share!
Here's a close up 'cuz I think it looks cool! Hope your day is colorful!
Sunday, April 13, 2008
Just so Hippy Bag tag

My friend Jenn had her baby (finally:) and I made this bag tag for her 2 yr old who is now a BIG brother. The baby got one too, but I took that one to the hospital today when I went to visit and hold the sweet bundle! He is adorable and he's a lucky little boy to be headed home to the wonderful family that awaits him, including his big brothers... all 3 of them. I just love this little giraffe by Melanie Muehchinger at Gina K. I wish I had thought of this one when I did the baby's tag, but he got the cute little zebra from zoofari. The tag is a medium-hard hockey card protector sleeve, punched with the crop a dile and strung with a ball chain. I got a bunch of these last year when we did them for my son's hockey tournament... wish I had the Crop a Dile then!! Thanks for peeking in!
my little stamp campers


WoW... Another busy weekend gone already! I really wanted to work on something spectacular to post for you all, but didn't have much time to spend in my craft room. So instead, I am sharing a photo of my most spectacular creations ever - well, I can only take credit for 2 of them, but they are all spectacular! My boys have their cousin spending a couple of days of spring vacation with them and they really wanted to craft with me. We made bag tags earlier in the day and then after dinner, I promised them that I would hold a special session of stamp camp just for them. They often see the kitchen filled with ladies enjoying some stamping time, and they deserve a session now and then too. You probably can't tell from the picture, but I love that they all put their own spin on their cards. The "little" one on the left is my "baby" (7) and his card says "I'd rather be fishing" and has a turtle riding on the inner tube. The middle one is my nephew and his card says "life under the sea is great" and has a dolphin jumping out of the water. The one one the right is my oldest son (10) while, he's very creative, he didn't deviate much from the orginal design, and in fact, even noticed that they didn't have the river rock mat on their card! After this, they all made bookmarks. Just like us crazy crafters, once we get started, they didn't want to stop and they are already planning tomorrow's project! I think this beats the hockey game we went to last night hands down:)
Friday, April 11, 2008
April Technique Club Cards

 Hey there! Here are this month's DIVA Technique cards. We will be doing Poppin' Pastels and Stamping with Bleach. The little dots and the flower centers on the bleach tech card are done with the butt end of the paint brush dipped in bleach. Hope my Diva's like them... Hope you all have a great weekend ;)
Thursday, April 10, 2008
Bleach Technique Card

Hi everyone! Sorry it's been a couple of days since my last post. I did come home from work tonight and have the urge to make a quick and I mean quick card using the bleach technique so I could have some show and tell for my diva's next week in technique class. This card took longer for me to just leave alone than it did to create. It is pretty plain, but I still think it's cute. It would be a great card to demo. I stamped the flower from the new Always set in lavender lace and then carefully (as carefully as I am capable of LOL) painted the petals with bleach. The dots you see are made my a pencil eraser dabbed in bleach. Stamped the sentiment from just celebrate, tie a ribbon and presto a card suitable for any young girl. The colors don't show well, but the bleached areas really are much lighter than the card base. Thanks for stopping by! See ya soon! I have tomorrow and monday off - long weekend - yeah! The boys and I are going to make Bind it All books for them to track their points for each morning they get on the bus successfully without me having a cow!!
Monday, April 7, 2008
always popping pastels
 Today I was playing around with the popping pastels technique. This month's diva club hostess has chosen this as one of the group techniques. It's not my favorite technique, so I figured I'd better play around to see what I could come up with. The heart on the main image (I know this is a busy card, so you'll have to look hard for the main image.. LOL) is stamped with versamark on craft paper and then colored with my stampin pastels and a q-tip. I decided to go with something else for diva club, but didn't want this image to go to waste as it was okay.... so I made an okay card to go with it. Not my favorite card ever, but thought I'd share anyway. The other cool things about this card are the always is punched using my 1 1/4 punch and popped on dimensials on the green layer below which is punced with the 1 3/8 punch. The branch thingy that comes with this set has almost enough bend to it to make a wreath with. Thanks for stopping by!
Sunday, April 6, 2008
Big Daddy Beer and Just so Hippy Monkey Cards
Today was supposed to be a day (morning at least) dedicated to stamping with a friend, but even the best laid plans don't always work. I didn't get much done while she was here, but I did manage to accomplish something...
This card is made using the new stamp that I got when I was on my "date" with DH last week when he looked through the clearance bin of stamps with me at AC Moore. We found this one and it called to me! This is the first card I've made with it, but this card was so easy, I'm sure I'll be using this stamp alot. The beer tab looking thing is an actual beer tab! I've been saving a bunch (yes, I drank them all) for awhile, knowing I'd find something to do with them - this seemed like a good opportunity. I colored in the beer cans with my silver sakura pen - they look more realistic IRL. This next card is actually the first one I did. It uses the Gina K set Just so Hippy. I saw on Melanie's blog, Hands, Head and Heart (I love that place), a card made with the monkey on a swing. Melanie designed these stamps, so she had TONS of great ideas on her blog using them. As many of you know, I am mainly a Stampin' Up! girl, but sometimes I sneek a little non SU stuff into my collection. This card requires a touch of drawing (the swing and the string) but it's really very easy. He is held onto the card with the circles and a brad so he really does swing. This card is for a special little boy from London who has cancer and comes to NY for treatments. He and his family are currently in the states and I will be sending a bunch of cards for them to sell to help raise money for his treatment and wanted to include a special card for him. If you'd like to learn more about Jack, check out this SCS thread. Thanks for stopping by!
Saturday, April 5, 2008
Sticky Cut Letters - mother's day card
 I think I'm tired. I sat and watched cops with DH and the boys and couldn't get motivated to come in a make something, but I really wanted to - I know, I'm weird! I pulled out my sticky cut letters as I just got some new cosmo fine glitter from Stampin' Up! and wanted to give it a try. I really liked how the heart sparkles - this picture really doesn't do it justice. The rest of the layout is from this weeks sketch challenge on splitcoast. Hope something about this card inspires you! Thanks for stopping by!
lifes a breeze
 Sorry I haven't posted in a couple of days - it's been a little hectic around here. Too many places to be and too few me's to go around:) I was starting to get the shakes from withdrawl today, so I figured I should stamp something - anything and get my fix!! This is what I did in the 5 minutes that I had to spare. I got this cute set and free wheel through stampin up's free wheelin promotion and wanted to try them out. My first instinct was to reach for the orange ink when inking the wheel of gold fish, but then the water and the bubbles would have been orange along with the fish. So, I inked them first in river rock and then randomly in old olive as when I think of real fish, I think green (and slimy). Then I hit the background with bashful blue on my stipple brush to fill in the water. The inner tube is popped up on dimensionals. My kids love to fish and they love to swim, but they don't like to swim with the fish! We camp lots in the summer and they really hesitate to swim in the lake - pansies :) Thanks for stoppin' by! I'll try to come up with something more challenging and creative after dinner.
Thursday, April 3, 2008
Milk Rocks - and so does my Niece!
My 13- year old niece is competing for a chance to sing on stage with Rascal Flatts! PLEASE, PLEASE click on the link below and vote daily for her!
http://www.brickfish.com/Pages/VideosSeries/VideoView.aspx?vid=5236_84343591&=PBB_RascalFlatts_240_PPIMEMAIL&isep=1&pbapi=-1&pbvi=14661745
Making Memories Embellishment Center

I got one - I got one!! In honor of my sis's birthday day today (happy birthday shannon - why did I have the strange urge to type Aggie?), I went shopping!! I had 2 50% off coupons just burning a whole in my purse and thought I'd go browse around. Since becomming a Stampin up! demo, it's just not the same going to the craft stores, I don't need alot of their stuff anymore, cuz I have an all access pass to the gorgeous stampin up stuff. I usually try to find some storage items with my coupons. I was thrilled when I saw this Making Memories Embellishment Center right there on the shelf, waiting for me to take her home!! I'd seen them in the pottery barn catalog for $99 and thought... maybe someday. Today is someday baby!! This was $79 less 50%!!! That's like what - 10 bucks (okay a little more, but it's still a good deal)! Don't all my things look beautiful in it? Well, that's cuz it's still in the box and this is the picture from the box - LOL! Anyway, just thought I'd share my moment of joy with you all this morning:)
Wednesday, April 2, 2008
masculine sympathy card

We received some sad news today. A man who just retired from my husbands work passed away today. Chris just went to his surprise 65th birthday party last weekend. How sad that this man worked so hard all his life and finally gets a chance to retire and enjoy his family and grand kids and has been taken from them so soon. His son still works with my husband, so I'm sure they will be taking a collection to send to him and they'll need a card to send. I don't like to do sympathy cards, but we all need them from time to time and this is a take on a card I had done awhile ago at a stamp camp. Quick and easy like I think a sympathy card should be - I don't want anyone thinking that I enjoyed making it - sounds silly I know, but it's the way I roll...
Subscribe to:
Posts (Atom)