


 Happy Holidays everyone! Hope you are all ready for christmas and it's just the fun stuff now! I was asked by one of my bosses to make a cute gift card holder for a gift card from his daughter to his wife. I hope this works for them! Here's the deets:
--I used the top note die to cut the gift card holder. I folded a normal A2 card and placed it on my top note die just insdie the top cut lines.
--After it was cut, I put a scrap of red cardstock back on the die and cut the piece for the inside (this is the piece that the gift card will slip into).
--The reindeer on front was made using the new scribbles swirl sizzix die from stampin up for the antlers, the large oval was used for the reindeer face and a unknown "splatt" punch was used for the hair tuft. I used the 1/4 circle punch for the nose and then flocked it so it was soft.
--The stars and snowflakes on the front of the card and the reindeer names inside are rub ons.
Hope this helps should you want to make your own! They are very quick and easy. Have a good one!
 Hi everyone! Are you all ready for the holidays?!? Only 9 more days - aaaah! I had an order for some gift certificates for Christmas, so I wanted to make a nice little presentation piece for the gift certificates. I used Beate's Criss Cross Card Tutorial found here on SCS. They went together really fast, but I did learn that you MUST use double sided paper for these or else you'll need to cut 2 DP squares. Once you cut the DP in half, it needs to be flipped over in order to fit the other side. (yes, I know that doesn't make ANY sense, but if you try it, you'll see). Instead of lots of extra bulk on the band, I went for a single piece of DP with a rub-on sentiment. I printed the inside pull out piece with the Gift Certificate info and taped it (with repositionable tape) over a piece of computer paper I had already run through the printer so I knew where the printing would line up. Thanks for stopping in and Happy HO Ho HOlidays!

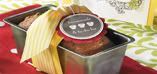
Here's part 2 of my MIL's birthday present. We don't really "do" presents as she would rather we spend the money on the kids' college funds, so I always try to put together a little something with heart. My 11 year old has an ipod and is constantly buying the latest and greatest tunes from I-tunes. I thought it would be fun to make her a mixed cd with all the "kids" music on it so she can stay as hip as she is. Is hip still a "useable" word?!? (just don't tell my kids I said that please) This is the outside view of the holder that I and my youngest son made to hold the CD. It matches her card, which is a couple of posts down.

 This picture shows the inside of the holder and the decorated (and named) CD. Below is a close up of the CD. I stamped the Hambo gardner with staz on ink and then colored in with my bic Mark-it permanent markers (sharpies). I love those things - I got a pack of 36 of them at Staples for around $18! If anyone wants the directions to make these, just let me know and I'll get the measurements posted. Thanks for stopping in and don't forget to pull up your pants before you bend over to garden!!


Holiday Extravaganza Sale Going On Now!! Shop online for bundles of holiday products for everyone on your list. Bundles priced 20 - 50% OFF. Nov. 26 - Dec. 1. Unfortunately, the site it so busy right now, I can't download or link the sales flyer. If you'd like a copy, please use the link at the right and email me - I'll be glad to email you one!
Click SHOP NOW in the top right-hand corner of my website (click here to go to the website). "Holiday Extravaganza" is listed under "Specials".
Happy Holiday Stamping To You!
Michele, Your Stampin’ Up! Demonstrator


 Has it really been more than a week since I posted?!? Where does the time go? I've been really busy with the the craft show last weekend, work, ortho appts and then of course my milestone birthday yesterday. Today, I spent the morning in my rubber room prepping for my back to basics class on saturday. The three projects shown will be the projects for that class. The students will make all these projects from start to finish. Usually, I prep and pre cut all materials. I want them to feel comfortable with the start to finish process. Each project even uses a left over piece from the previous one. The little mini gift bag pictured is inspired by the many that I made and sold at the craft show.


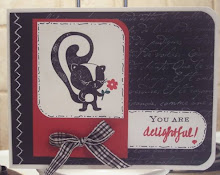
Hi again! I just got a call from my brother that my nephew got his first deer today! He's 13 and he got a big 7 point buck with his bow and arrow. I made this card quick to send to him as a congrats. This card uses the Noble Deer set from Stampin Up! that recently retired, but I'll never get rid of it as all my  brothers and my dad are hunters so it's "their" set... lol! Nothing fancy about this card, but sometimes the ones that go together so quickly are the best ones, right?
Thanks for stopping in again!


I finally had a chance to make a card for my mom and Dad's anniversary. They've had so many anniversaries, I wanted to use something a little different and unexpected for this year's card. Their anniversary was on halloween, so they are a little "off" like me, so I think they'll appreciate this card. The scalloped border around the sentiment was made by cutting the top 3rd off a SU scallop square punch and moving it down to make the top horizontal piece of the rectangle. The little doodling is done by using a plastic template I bought yesterday while out shopping. I just put the template down on my card and used a piece of it to marker inthe lines and then went over them with black diamond stickles to give it some shine. The "bride" crab has a small veil using the shell stamp from the Crab & Co. set. After I stamped it, I punched a hole in the bottom of it and scrunched (yes, techinal term) a piece of white tissue paper in through the hole and taped it to the back. 
Thanks for looking! Can anyone guess what kind of gift card is inside?


 Here's what I've been busy with for the last 3 hours! It's alot of pieces.... any guess what they could be for?
Isn't the girl cute? She's from DeNami Stamps and so is the sentiment on the other oval. I don't think my coluzzle has ever had such a workout!! Thanks for stopping in! I'll post the finished product at a later date... tease!

I apologize in advance for the bad pictures - I hate to even post pictures on my blog lately as I still haven't gotten a new camera yet. But you'll get the idea anyway.
These are the technique cards for Diva Club on Friday. We will be doing reverse masking and sparkle plenty. See this post for more info on what a Diva Club is or type Diva into the search bar in the upper left hand corner!
This is the full card we will make using one of our newly learned techniques. Here, I've used the reverse masking to do the oval behind the scarecrow. 
 Congratulations Gayla!!! You're a star and the winner of the first Rubber Room Challenge. This is the card that received the most votes. Gayla will receive a hand crafted prize from me! This card and the other cards for this challenge will be donated to the Ronald McDonald House Charities. Thanks for voting and thanks for playing!
 This is a horrible picture of a really cute diorama card I made for friends of ours who had a baby boy. She is a new stamper, so I really think she'll like this. Do you like it Julie? I used the Nursery Necessities set. Just above is name on the farthest back layer (the blue one) is a word window with the words "it's a boy" The "water" was made by cutting one piece and tearing another piece of bashful blue and direct to paper inking. DTP (Direct to paper) is when you take your ink pad and rub it directly on your paper. Here's the instructions for a diorama card:
--Cut your back and front pieces to 8 1/2 x 3 and score 2" in from each side
--Cut one middle piece that's 6 1/2 x 3 and score 1" in from each side.
--Using a punch (I used the curly label punch), line the edge of the punch up with the right score line on the middle and the front pieces, then move the punch to the left score line and do the same. Make sure your punch is pushed in all the way to the top so your punches are consistent. Punch out the connecting piece.
--Decorate your pieces.
--Adhere them together by putting adhesive first on the 1" flaps of the middle piece and attaching them to the bottom flaps, which come up. Then apply adhesive to the 2" score flaps on the top piece and adhere to the outside of the bottom flaps.
--The card will fold flat for mailing. You'll need a longer than normal envelope... (3 3/4 x 7 1/2). It's a little bit longer than a check envelope. If you need more info - here's a link to the splitcoast tutorial which has pictures....
 Hi everyone! TGIF, huh?! Here's a quick card I made for a wedding DH and I are going to tomorrow night. I usually try to make their card out of pieces of their wedding invitation, but I can't find this one. (We've had 3 weddings in the last month). So, I got out the trusty together forever set and whipped this up. I already had the togther forever embossed on the vellum, so that's where I started. Then, I found this piece of already cut really rust from a bridal shower card I had made for anther wedding. Well, before you know it, this card emerged. The very vanilla layer is cuttlebugged (well, sorta). I wanted to try the cuttlebug folder in my new big shot. I used tab 3 on the multi-purpose platform and then the cb folder with paper in it, then the crease pad and the cutting pad. It didn't "feel" like it was working, but it embossed just fine! Thanks for stoppin' in!


This is a birthday gift for a co-worker who also stamps! She is always making little lists, so I thought a little top note-book would get some use and then she wouldn't have to worry about the post it notes fallung off her classes case anymore... LOL!
The note book is made using the new Top Note Die from Stampin UP! I just moved the chipboard over so it wouldn't cut the curve on the binding side (or you could cut it off later). I adhered patterened paper to both sides of some cardboard I had lying around (think cereal boxes) and then ran it through the big shot - cut like butter!! Then I cut some copy paper down to size and rounded the corners to give it more of a finished look and punched everything with my Bind it All. Hint: Attach the ribbon AFTER you punch the holes with the BIA - ask me how I know!
Then inside I decorated a little bit and put in a little pocket on the front cover for her present (a gift card to SU). And, she can tuck her post it notes in here later :) Then it needed a pretty presentation, so I made a matching RSVP pen and bog in a box. I'll come back later and post a link with directions for the bag in a box. Gotta get to work right now (and give her her present) Thanks for stopping in!


