CLICK HERE FOR THOUSANDS OF FREE BLOGGER TEMPLATES »

Wednesday, November 26, 2008

harvest moon - hambo stamp card


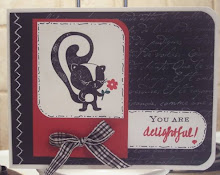
Happy Wednesday everyone! Is everyone ready for turkey day? I'm not, but I took time out last night to ink up my Harvest Moon lady from Hambo Stamps. They are having a sale until midnight tonight and I promised myself I wouldn't buy any more until I used the ones I had! I made this card for my MIL, who is an avid gardner. Her b-day is coming up and for once, I'm prepared for it! It looks much better IRL, I don't know why the picture is so fuzzy - I really hope Santa brings me a new camera! Anyway, the sentiment reads Happy Birthday to someone who's still got it...

even if it's hanging a little lower than it used to! I know she'll get a kick out of it! She's colored with the aqua painter and ink from the lids of my SU pads.
ETA: I added pattern to the shirt and hat by paper piecing them. I stamped the whole image onto the cardstock, then the parts I wanted the pattern on again onto patterned paper (flowered for the shirt and wicker-ish for the hat). Once the image is stamped on the patterened paper, cut out the piece (shirt & hat here) just inside the lines and glue or pop dot onto the colored cardstock image. The shirt is glued and the hat is popped.

HOLIDAY EXTRAVAGANZA - STAMPIN' UP! SALE!!


Holiday Extravaganza Sale Going On Now!! Shop online for bundles of holiday products for everyone on your list. Bundles priced 20 - 50% OFF. Nov. 26 - Dec. 1. Unfortunately, the site it so busy right now, I can't download or link the sales flyer. If you'd like a copy, please use the link at the right and email me - I'll be glad to email you one!


Click SHOP NOW in the top right-hand corner of my website (click here to go to the website). "Holiday Extravaganza" is listed under "Specials".


Happy Holiday Stamping To You!
Michele, Your Stampin’ Up! Demonstrator

Tuesday, November 25, 2008

cupcake christmas


Tis the season... to start making Christmas cards! I've been wanting to play with my new cupcake ocassions set from All that Scraps. This set was designed by my CNY stamping friend, Diane Zechman, AKA cookiestamper. It is an adorable set that has images for all the holidays as cupcake toppers. This card is called a tent topper card. You make it by folding the card base a bit shorter than normal, so that the topper can stick up and yet still fit in a standard envelope. This base is cut to 5 1/2 x 7, so when it's folded, it's 5 1/2 x 3, then the topper sticks above the card base 1.5 inches. A little tip, have a "normal sized" card next to your tent topper and use it as a guide so you can easily know where your topper should end. Thanks for stopping by today.

Saturday, November 22, 2008

show some stampin' support!


Do you ever wonder if you have the BESTEST group of stampers?!? Well, I'm sorry to say that you can't, 'cause I do! At my basics class today, I had a bunch of my regulars and they surprised me with cake and singing and presents before class! What a great group of ladies I am blessed with - thank you so much! The cake has a bra on it and reads "Michele is 40 let's show her some support" LOL! And did I mention that it was delicious Karen! Holy cow - it has been a week full of cake for me!
Just wanted to share my joy and publicly thank my wonderful group - you guys ROCK!

Thursday, November 20, 2008

Basics Class Projects and Expo mini gift boxes

Has it really been more than a week since I posted?!? Where does the time go? I've been really busy with the the craft show last weekend, work, ortho appts and then of course my milestone birthday yesterday. Today, I spent the morning in my rubber room prepping for my back to basics class on saturday. The three projects shown will be the projects for that class. The students will make all these projects from start to finish. Usually, I prep and pre cut all materials. I want them to feel comfortable with the start to finish process. Each project even uses a left over piece from the previous one. The little mini gift bag pictured is inspired by the many that I made and sold at the craft show.


These are the gift bags that I sold out of at the craft show - they were the big hit at my table. I had a custom order for 11 more, and that's what is shown here. Each mini bag uses a half sheet of cardstock and then you just score and snip it before taping it together. They go together pretty quickly. The tutorial I used to make these bags can be found at www.stampingvideos.com

Tuesday, November 11, 2008

Austins Noble Deer


Hi again! I just got a call from my brother that my nephew got his first deer today! He's 13 and he got a big 7 point buck with his bow and arrow. I made this card quick to send to him as a congrats. This card uses the Noble Deer set from Stampin Up! that recently retired, but I'll never get rid of it as all my brothers and my dad are hunters so it's "their" set... lol! Nothing fancy about this card, but sometimes the ones that go together so quickly are the best ones, right?


Thanks for stopping in again!

season of wishes


Tis the season of wishes and friendship!! This is a card done using the crayon resist technique. Can you see the "snow" in the crooks of the tree and notice that the snowman stayed white while the sky was colored around him? You color certain parts of your image with a wax crayon before coloring, then rub off the crayon to reveal the white again! It's fun, easy and a big wow! We will be doing this technique at our DIVA club this month and I'm playing around trying to decide on a project for the girls to make.
Hope everyone is enjoying their day off today and a big THANKS to the Vetrans for their service!

Monday, November 10, 2008

Stampin' Up! Rub-Ons Promotion


Rub-Ons Promotion

Rub on some cheer! Click here to see the flyer!

From November 10-30, get 20 percent off all Rub-Ons when you spend $20 on Stampin' Up! products.For only $8.76 per package (regularly $10.95), you can get any of Stampin' Up!'s fun and unique Rub-Ons that can be used on cards, scrapbook pages, crafting projects, and more!
Item # Page # Rub-Ons Description
111417 178 Word Flurries
111277 178 A Perfect Day
111416 178 Chateau Bella
111414 178 Hidden Garden
110283 179 Take Note
111806 179 Chills & Thrills
111804 179 Chit Chat
111415 179 Greatest Moments
111805 179 School Days
110282 179 Anchored
128443 11* Old Saint Nick
112843 17* Season of Cheer
112735 39** Hidden Garden Blossoms


*From Holiday 2008 Mini Catalog

**From Celebrando Creatividad

Sunday, November 9, 2008

snappy anniversary with crab & co.

I finally had a chance to make a card for my mom and Dad's anniversary. They've had so many anniversaries, I wanted to use something a little different and unexpected for this year's card. Their anniversary was on halloween, so they are a little "off" like me, so I think they'll appreciate this card. The scalloped border around the sentiment was made by cutting the top 3rd off a SU scallop square punch and moving it down to make the top horizontal piece of the rectangle. The little doodling is done by using a plastic template I bought yesterday while out shopping. I just put the template down on my card and used a piece of it to marker inthe lines and then went over them with black diamond stickles to give it some shine. The "bride" crab has a small veil using the shell stamp from the Crab & Co. set. After I stamped it, I punched a hole in the bottom of it and scrunched (yes, techinal term) a piece of white tissue paper in through the hole and taped it to the back.

Thanks for looking! Can anyone guess what kind of gift card is inside?

Friday, November 7, 2008

CNY Swaps - Denami MiMi with chocolate


Swaps anyone? Tomorrow I am headed to Syracuse, NY for a crazy day of stamping, eating and chatting with my fellow Central New York Stamping friends!! I can't wait to get there and see everyone again. This is one of the projects that I've been working on that I will be taking with me. I showed you a sneak peak of this cardfront a week or so ago in this post. Here they are in the final stages of completion! I made 27 of these to swap with the other girls who signed up for the cardfront swap. I am also participating the Demo Quality Swap... I'll post those and other projects from the day soon! Hope the girls like 'em!!

Tuesday, November 4, 2008

craft fair - home expo items. Altered Cocoa containers


Hi there! I've been working on a bunch of swaps for an upcoming gathering of crazy Central New York Girls, so I haven't had much to post lately, but I did make these altered cocoa containers for a craft fair/home expo that I will be doing on November 15th. If you are in the area of Orchard Hall in Sauquoit, NY on the 15th stop by to see us! I'll post more info on my blog soon!
Anyway, I picked up this cocoa a while ago when I found it on sale thinking it would make a nice teacher/bus driver gift to offer for sale at the craft fair. I used the retired stampin up set Like it a Latte to make the steaming cup of cocoa on the front. You probably can't tell from the picture, but the whipped cream is dimensional by using liquid applique. Really cute. I left the sides uncovered as the directions for mixing hot and cold drinks is printed there. Thanks for stopping in today - hope you're keeping warm and snuggly!

Sunday, November 2, 2008

Photo Light Box


Here's my highly technical light box - LOL! It really does help to take a decent picture of my creations - especially since my macro setting broke on my camera. You can see from the picture of the box with the light shining into it how bright it is in there. All I did was find a cardboard box that was white on the outside and cut it open at the seams and basically turn it inside out and tape it back up. The bottom is open and I just slide a piece of white paper in when I'm going to take a picture. The lamp I use is an ott-like light. I got this one from Home Depot and while I don't have an Ott, I'm told that it is very similar and a MUCH more affordable option. This light cost me about $10 and it came with the bulb! It's perfect for the basement when I have to color or need to work on fine details.


This is the set up before the light is bent down to shine in the box. The other picture is the box being stored under my work surface when not in use. So there you have my highly technical photo system :) Hope this helps someone out there!