CLICK HERE FOR THOUSANDS OF FREE BLOGGER TEMPLATES »

Friday, March 27, 2009

I made Cupcakes today


Okay, so they are not "real" cupcakes and my kids probably won't like them much, but I sure am happy with how they turned out. They will be a little gift for someone special in my life.... could it be...... you?
Again today, I used a set illustrated by my friend Diane. This one is called cupcake occasions. I knew I wanted to cover a bunch of bases and this set has something for everyone. You can see it here. I stamped all the images on 2 x 2 1/4 pieces of white and colored them all (2 of each). Then, I grabbed my scrap bucket and went to work assembling and embellishing. All the tag bases are 2 1/2 x 4 1/4 except for one. After I took this picture, I went back and added matching embrodiery floss to each tag. When I was all done, I knew I needed something to present/hold them in, so I modified the top note purse I made yesterday and left the lid off. The box that holds the tags is 5 1/2" x 6". I scored the 5 1/2" side at 1", flip it around and score at 1" on the other side. Then score the 6" side at 2 1/2" & 3 1/2". Thanks for stopping in today.


Thursday, March 26, 2009

Gotta love M&M's!


My co-workers have been working on an adorable M&M scrapbook page and asked me to cut some letters with my naturally serif die for them to use as a title. I ended up with a couple of extra "m's", so I thought I'd make my own M&M project. Isn't it cute?

A purse and some ducks

I had some time to play this morning and I thought I'd make some 3-d items with my favorite dp - raspberry tart. I LOVE this stuff and I also love how it coordinates with the current in-colors. I saw this adorable purse here and wanted to try my own. Almost every day I find something that I put into my Blog Ideas to Try favorites folder and rarely do I ever actually go back and try someting. I'm glad I gave this one a shot (a big shot lol) and made my own cute little purse. The one thing that I found that is not explained on Becky's blog is where to score my scallop circle to fit over the top. Not too difficult to figure out, but figured I'd let you all know that I just counted 12 scallops and scored from left to right. If you leave 3 scallops in the center, you'll end up with 12 scallops in the front and 12 in the back - get it? Thanks for stopping in today! Look who else stopped in today -
There were 2 ducks swimming in our pool this morning. The kids were just headed out to feed them some bread when they flew away. The brown one is hard to see, but is just in front of the pretty mallard (I think it's a mallard anyway).

Tuesday, March 24, 2009

Happy Birthday Mom!!

Today is my mom's birthday - HAPPY BIRTHDAY MOM!! This is picture of her with my niece doing what she does best - loving and playing with her grandkids:) My mom is the mother of 5 and grandmother of 14 - she doen's look it does she? What an amazing woman she is - married to a dairy farmer for almost 50 years, raising 5 kids (none of which ever spent time in jail) and still has plenty of love and energy for each of her 14 grandchildren and her garden! You rock mom - I love you!

Here is the card I made for my mom. As I said, we were a farming family and cows hold a special place in all of our hearts. I used Annabelle for this card - she's just too cute. The bashful blue mat is textured with a sizzix texture plate that was put through my big shot machine. The doodling around annabelle is part of the stamp. I doodled around the blue mat in an attempt to match the circle.


Wednesday, March 18, 2009

Matchbox Die treasure chest


I made time to play! The first thing I wanted to try was the new matchbox bigz xl die from the occasions mini. It makes this adorable little sliding box thing. I saw this on SCS and wanted to try to make my own. You make 3 matchboxes and stack them and then wrap with a piece of dp (cut to 2 5/8 x 10) around all three. Tip: Tape the dp to the sides of the boxes so they will pull out and their "case" stays behind. The drawer pulls are half back pearls from the pretties kit. The ribbon in the free SAB ribbon (love that stuff) and the tag is made using 3 new things...
1. The Yummy Stamp free SAB Set - stamped with certainly celery on white cardstock
2. The Brandy-New scallop oval punch (will be available in the mini) - yellow piece
3. One of the tags that is included with the matchbox die (3 tags on this die) - the blue piece
I filled mine with mini snickers, but I can see lots of different little treats in this quick project. Can't wait to show you more.....

My Occasions Mini Pre-Order is here!


While I have not had much time to stamp lately, I still had time to shop - lol! This is what was in my SU box yesterday... it's my Occasions Mini Pre-Order toys!! As a demo, I get to see the minis and catalogs a bit before they "go live" and even get to order from them ahead of time so I can make lots of samples and have product to show you when it becomes available to customers. I had time to mount all these sets yesterday (quick work now that everything is die cut!) Now to find a place to put all this new stuff and then to find time to play with it all!! Hope to have something new to show you soon! Thanks for stopping in - sorry I've been so MIA lately. I've missed you all!

Saturday, March 7, 2009

tutorial - how to make a rectangle window with the tab punch


So I haven't been doing alot of stamping for my blog lately, but I have been working on some speical swaps for an upcoming gathering in Buffalo. Well, it's not until April, but it's HUGE, so I figured I'd better get a jump on things. This is a little sneak peek at one of my projects, and a tutorial borne of necessity to go along with it! I needed a "window" in a rectangle, but didn't have a square punch big enough, so I improvised with my large tab punch and it worked like a charm!! Here's what I did:
1. I started with a 3.5 x 3 rectangle
2. Centered my tag punch all the way in and and punched out a tag
3. Then I turned the paper around and lined up the edges to complete the rectangle. Easy Peasy, huh?!?
Hope you enjoy and find some reason to use a "window" in your projects! Wonder if anyone can identify this when we get to Buffalo?!?

Monday, February 23, 2009

SCS Gathering in Maine, NY - Shoebox Project


This was my contribution for the shoebox swap (see previous post) at the recent SCS CNY gathering in Maine, NY. I was unwrapping (no, not eating, just unwrapping...lol) hershey kisses one day and had a lightbulb moment - The wrapper could be a saw blade! So I stamped the saw onto the wrapper and then stamped the saw again onto the kraft piece of cardstock. I cut out the metallic saw blade and glued it to the kraft piece. Everything else on this card is pretty self-explanatory, but if you have any questions, feel free to post them and I'll answer ya!! THanks for stopping in!

CNY SCS Gatheirng in Maine, NY - Demo Quality Swap

I recently attended a gathering of Central and Southern Tier NY'ers in Maine, NY. We routinely gather to swap cards, atc's (Artist Trading Cards), Recipie Swaps and stamp together making shoebox projects. A shoebox project is where everyone brings enough pre-cut supplies for the other people at their table to make their project. I participated in the Demo Quality Swap. In this swap, your whole cardfront had to be completely current SU supplies. I called my offering Quilted Tarts. I started by cutting a piece of creamy carmel paper to 4 x 5 and then adhering coordinating 1" pieces to it. I chose Raspberry Tart Designer paper as it's my new favorite and because I knew it would all match and I wouldn't have to worry about that part. After the 4 x 5 piece was covered with 1" square of DP, I ran it through my top note die, then through the big shot again using the new SU texture plate called damask. I adhered the top note piece to a mat of pink pirouette which I had pierced with my pokey poke and the mat pack. Then I stamped thank you using a stamp from the cute and curly set and punched it out with the curly label punch and attached a "button" I had previously die cut using the Buttons #5 sizlet and covered with crystal effects and let dry. The whole card was then attached to a kiwi kiss base. I repeated this 12 times and viola a Demo Quality swap!

Thursday, February 19, 2009

what do I do with those watercolor wonder crayons?

That's what this month's DIVA hostess wanted to know.... so I ordered some (yes, I don't have EVERYTHING) and got to work. I'll be honest, I had a bit of a hard time achieving a look that I really liked. This card doesn't show very well, but the flowers are pretty IRL. To get these flowers, I first spritzed my inspired by nature stamp with water, then colored directly onto the stamp with the crayons, spritzed again a couple of times and stamped onto very vanilla cardstock. I'd seen a card much like this on SCS and decided to try it to see if it would work for my DIVA's. I hope they like it, as it's the card we will be doing friday night. We will also color with the crayons directly onto the paper and pick up color from the end of the crayon with an aqua brush. The card is called a tent topper and the base is cut to 4 1/4 x 8 1/2, then folded to make a 4 1/4 inch square. Then you make your focal image any size and shape you want and use a finished card or an envelope to determine placement onto your card base.... KWIM? Thanks for stopping by my rubber room today!

Thursday, February 12, 2009

A happy Heart birthday card


Man! Has it really been 10 days since my last post? I'm sorry I'm not a better blogger :( Today I wanted to share a picture of the 2nd card we did at last week's workshop. The girls liked it and it was a nice workshop card as it is not difficult at all. The card base is pink pirouette and also used is chocolate chip (punched with the new eyelet scalloped border), riding hood red and whisper white. The dandelions are stamped with pink pirouette and riding hood red progressively. Progressive stamping is when you ink the stamp and stamp it full strength, then stamp again without reinking. You get varying shades of matching color this way.... very easy! Well, anyway, hope you like today's card. I'm working on a video tour of the rubber room, but first I need to clean it! Happy Valentines Day - hug someone!

Monday, February 2, 2009

happy heart day!

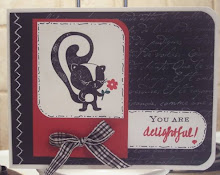
Hi there! I can't believe it's February already - seriously, where does the time go? I love valentines day since being married - no pressure to find a valentine or feeling like a loser without one, but instead just a nice opportunity to tell (and show... if you're not to tired) your valentine how much you love him. I'm very lucky to have such a great valentine - those who know him, know he's great and he is. There, the telling part is done :)

Anyhoo... here's a card I made tonight. This may be a make and take project for an upcoming workshop. It uses lots of new products including the SU exclusive texturz plate (on the pink pirouette piece), the new 3 heart and eyelet border punches and the A Happy Heart set that made it into the big catty from the mini (yeah!). Thanks for stopping in today and Happy Heart Day - hugs!
Sunday, January 25, 2009

SAB - Great time to join and hostess!

Did you know ?
Sale- a- bration time is right around the corner and this would be a GREAT time to sign up as a SU! demonstrator , Why? Because on top of the already fabulous goodies you get in the starter kit you will also recieve a FREE stamp set.... any set from the new 2009 catalog ( valued up to 47.95) between Feb 1, 2009- March 31, 2009. Plus you can sign up with me online by clicking HERE and then choosing the Join Stampin' Up tab. If your interested in Joining the SU! family and my stamping team CONTACT ME via the link to the right for more details as you will need my password to access the forms online.

SAB BROCHURES HAVE BEEN MAILED! If you've placed an order with me recently, you should be receiving your copy in the mail. Check out all the great stams (and even ribbon) that you get for FREE with each $50 ordered! The perfect time to host your first workshop and/or build your supplies! If you'd like to host a show during this time, CONTACT ME via the link on the right ----> A link to the brochure will be posted soon.

Sunday, January 18, 2009

Card Kit Challenge

Every so often I host a Rubber Room Challenge for the girls who come to my open house or BYOP (bring your own project). This challenge featured the use of a left over card kit from a stamp camp or workshop. The girls could pick a card kit as their base and use a limited supply of scraps and ribbon. They also had to use stamps that will be in the New Spring/Summer 09 catalog that I had on display from my pre-order. Their creations are being posted and are open for voting for 1 week. On January 25th, the one with the most comments (here and on my SCS Gallery) will receive a retired hostess set. So please show the girls some love and vote for your favorite! TFL!


Entry No. 1

Entry #2

Entry #3

Which one will you vote for?

Saturday, January 17, 2009

Happy 40th Junie!

Tonight I got to share a little time with some "old" friends - now by old I don't mean age... even though Junie IS turning 40 now too lol! I love spending time with old friends - there is nothing like reliving your youth with girls you have know all your life! I'm so thankful to have maintained a connection with these truly special girls - even though I can't convince them to stamp! Oh well, I'll keep 'em anyway :) The magnet above was cliped to a gift bag.


Here's the card I made for Julie (Only I am allowed to call her Junie). The inside reads "remember when we were young and couldn't wait to get older"..... "boy we're we stupid or what?!"


Here's a snapshot of us taken by our waitress. Front is the Birthday Girl, Junie. Then left to right is Lisa, Me and Tricia. Here's to good friends - just don't drink the martini's!

Friday, January 16, 2009

sneak peak - petal pizzaz from Stampin up's Spring/Summer 2009 catalog


Here's another sample for the New Catty Kick off Open House. This one uses the new set coming out called Petal Pizzaz. The scalloped flower is a solid image stamp and the inner flower is also a solid image stamp. I used my Stamp-a-ma-jig to line the centers up and then put a white eyelet in the middle. The red accent is a left over piece after I cut a top note using my top note die in the bigshot, then turning it 180 degrees and cutting it again - kinda into a squareish shape. After you do this, there are 2 of these pieces left over and I think the resemble parenthese (sp?). Anyhoo, thanks for looking - have a great one!

Thursday, January 15, 2009

New Catalog Bookmark Wish List


Hi there! I'm so excited that that new catalogs are now arriving. I have all of the ones that I pre-ordered, but I was a little late in getting these bookmarks ready to give out with the catty's - so anyone who has already picked your catty, please remind me to give you one of these cute bookmarks. I found the template for the printed side a while ago on splitcoast. If anyone needs it, email me and I'll be glad to send it to you. Sadly, I can't post word documents on my blog :(

After printing and cutting them, I backed them with some close to cocoa dp, then stamped a flower from the new set called Petal Pizzaz on the front and added some ribbon. The perfect way to keep your wish wish close at hand! Thanks for looking. If you still need a catty - email me and we'll figure out how best to get one in your hot little hands! Cost is $10... or $7 if you've placed an order with me since the last catalog!

Tuesday, January 13, 2009

Big Shot

Big Shot Spoiler:

Okay you are all going to want to get the Big Shot now! You are going to love the textured templates. They are a great deal -- for only $11.95 you get 3, 2-sided templates. That's less than $2 per texture!

Coming in February - Big Shot Pop-Up dies. You will be able to get a die to make pop-up cards. The dies will cut out all of the pieces you need to make fabulous pop-ups. One is a beach ball and one is a three-tiered cake. The three-tiered cake comes with candles for a birthday or a miniature bride and groom.

Coming in March - Embossing folders!

Wowza - can't wait to get more big shot accessories to play with and show you! I have one new one to show you at my new Catty Open House this Sunday from 12-4 in the Rubber Room - hope to see you there!

Saturday, January 10, 2009

Another Stampin Up sneak peak with Petal Pizzaz


Here's another sneak peek at a brand new stampin up set. This card is made using Petal Pizzaz. These are a bunch of solid image flowers and leaves. There are 2 different stamps used to make the flower and the leaves are from this new set too. The stem is made by free hand cutting a strip of kiwi kiss paper and then crimping it. The designer paper is from the new designer paper called Raspberry Tart. The word love is cut using my naturally serif alphabet die and the big shot. The "U" is some retired chipboard that I colored with Riding Hood Red and then covered with dazzling diamond. Thanks for looking - hope you like it... Love U ;)

Friday, January 9, 2009

raspberry tart and sweet stems - sneak peek Spring Summer 2009

Hi there! Sorry it's been so long since I blogged - I'm having a hard time getting back into the swing of things since the holidays. As a demo, we were able to pre-order some select stuff that will be in the new catalog (which should be here next week!). These two cards use a new set called sweet stems. It's a cute little set that has four different flowers in it. One stamp is used on the card above and another stamp is used on the card below. Also on these cards is new Designer Series Paper called Raspberry Tart - LOVE this stuff - it's sooo pretty. The colors in it are Riding Hood Red, Kiwi Kiss and Pink Pirouette - ooooh.... It's so yummy! These cards are cased from cards found on Splitcoast - I told you I was having a hard time getting my mojo back. When I have times like that (Yes, it happens to demos with all sorts of new goodies too), I find that if I go look for inspiration and create SOMETHING, anything.... even if it's a copy of someone else's design, I become inspired and am back on track quickly.

Here's a belated Happpy New Year wish from my son. The kids thought it would be a good idea to write Happy New Year on their faces with baseball eye black. Not really alot of fun scrubbig that off his face at 1 am! He's my little old man as he always wears his glasses at the end of his nose like that and looks over them - I often wonder why he even puts them on his face?!? And, before anyone turns me in - that's sparkling grape juice :) So Anyway - Happy New Year to you and yours!!