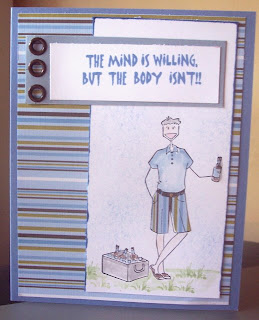
 Here's a quick card I made this morning. I needed a card for my uncle who turns 60 this weekend. I figured he'd get a chuckle out of the sentiment. The inside reads: Party your panties off!
Notice his shorts are the same patternn as the background paper? That's called paper piecing and it's really easy. Just stamp your full image onto white cardstock and color everything but his shorts. Now stamp him again onto patterned paper and cut just inside the lines. Glue his little pants on like paper dolls and viola - patterned apparel! He is a bella stamp called beerafella and the little grass blades are made with the grass stamp from this Hip Hop Accessories Set. The sentiments are Rubbernecker. Check out other masculine cards on the splitcoast dare to get dirty challenge thread. TFL! Have a great day!
Thursday, July 24, 2008
Masculine card Challenge - beerafella
Posted by Tilly at 1:05 PM 1 comments
Labels: Bella, Rubbernecker Cards
Tuesday, July 22, 2008
Stampin' Up! Announces Online ordering!
Holy Cow Dude!! Shelli Gardner just announced that Stampin' Up! is going to be unveiling a new ONLINE ORDERING system! You will be able to order through a demo business website like mine or directly through the company's customer website. (but you'd better order through mine... LOL!)
Here;s what I know so far:
--The Demo Locater is being changed and will list all demos within a certain proximity who have a business website. They will also have a Demo Directory so you can easily find YOUR demo, if you already have one.
--You will be able to order from your demo's business website and receive 1) catalog pricing 2) lower shipping and 3) Stampin' Rewards (oooh, this sounds fun!)
--If you absolutely do not want to have a demo, you will also be able to order directly from the Stampin' Up! customer website BUT the prices will be 10% higher, you'll also pay higher shipping, and you will not receive Stampin' Rewards.
--If you start an order on the Stampin' Up! customer website - you will be given many opportunities to either use the Demo Locater or the Demo Directory and choose a demo. Doing so will lower the prices 10% to equal those in the catalog. However, if you complete the order through the company's customer website you will still pay higher shipping prices and you will not receive Stampin' Rewards.
--The only way to receive catalog prices, lower shipping, and Stampin' Rewards on your online orders will be to order directly from a Demo Business Website (my Stampin Up! Website).
--More details will be announced tomorrow! I'm so excited about this wonderful news and I know many of you will be too! Of course, you will still be able to order personally through a demo, like always, but if you're like me and like to shop when the stores aren't open ( the convenience of online ordering is going to be fabulous! I'll keep you posted!
Posted by Tilly at 6:51 PM 0 comments
Labels: On-line Ordering
Saturday, July 19, 2008
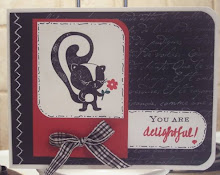
fall winter catalog cards
Posted by Tilly at 1:14 PM 2 comments
Labels: Scallop Edge Punch, Sneak Peaks, SU Cards
Wednesday, July 16, 2008
Sneak Peak - Fall/Winter Idea Book 2008

I finally received my demo pre-order merchandise today. One of my favoriete perks is that as demo's we get a chance to order limited merchadise from the new catalog that will be released on August 11th. SU does this so we have some of the fresh, new materials to share with you as soon as it become available.
Here are some pictures of some of the brandy new goodies I received today. This Designer Series Paper is called Bella Rose and is Bea-u-timous! It has alot of the new in-colors (pictured below) and also chocolate chip. Love, love, love it!
New In-colors:
--Orangey color is called Tangerine Tango
--Red color is called RIding Hood Red and is very close to the old Cranberry Crisp (just a shade bolder)
--Pink is a beautiful soft pink called Pink Pirouette (I think this one might be my fav)
--Light blue color is called Baja Breeze. It's very watery and summery looking to me!
--Green color is called Kiwi Kiss and it looks like a darker version of River Rock to me.
--Darker Blue is called Pacific Point.
Now that I have all the new in colors lined up next to the old in colors (river rock, groovy guava, wild wasabi, etc). The new in colors are quite similar, just more saturated colors. I like 'em!

Last are some of the new stamp sets that I pre-ordered.
--Top left is called head from the heart and has 4 sayings combining script and typed fonts - pretty!
--Bottom left is a small set called wow flowers. The one flower has a happy birthday sentiment around it. There is also a thank you and a birthday wishes stamp.
--Top right will be a new hostess (level 2) set called deer friends and contains 8 circle stamps with various holiday sentiments and images.
--bottom right is Dreams du Jour. I think this will be a very versitile set.
And last, but not least - what will be my new favorite-ist tool ever - a Scallop Border Punch! Can't wait to test this baby out! There is a link to a video using this tool on the sidebar.
Okay, so there's a sneak peak - now to get inkin'!
Posted by Tilly at 8:58 PM 0 comments
Labels: Sneak Peaks
Sunday, July 13, 2008
Squash book
Posted by Tilly at 3:33 PM 0 comments
Labels: 3-d projects
Saturday, July 12, 2008
Decor Elements on a Frame...

 Which one do you like better? In the blue one, I changed out the background paper and removed the thick inner circle leaving only the dots... I really like having the ability to change the background, especially not knowing what color my new space will be.
Well, I finally got around to doing something with some of my decor elements. I purchased a frame a while ago at Walmart, but it wasn't big enough, so this project got pushed aside until today. I was in Big Lots and I found this frame which was 14 x 18 for $10, so I decided to give it a try. I put my elements directly onto the front of the glass frame, so that I could change out the look by replacing the background paper. This is a piece (actually 1.5 pieces) from the retired linen prints I think. Once I centered the paper, I reinserted the mat that came with the frame to finish off the outside edges as the frame is 14" and the paper is only 12. It looks okay in the picture, but don't come to my house to look at it closely - it was not easy to put on! I shouldn't tell you all this and scare you, but at least I've been there done that, so when you are ready, I'll have some tips for you...
Tip #1 - DO NOT put the monogram on first and then try to center the frame around it - you cannot see the letter through the transfer sheet.
Tip #2 - DO NOT decide to just cut out the middle of the transfer paper from the frame. Now you can see the monogram to center around, but the frame as no rigidity and once it touches the glass - it's there.
Tip #3 - DO NOT attempt to do this at 10:30 at night with all those freaking little bugs that gather by the light after the kids have been in and out of the house a millon times - the PIA's (the bugs not the kids) land on the glass just as you are putting down the vinyl....argh!
Tip #4 - DO NOT attempt to do this after having a couple vanilla vodka's & diet cokes! (I know, that's probably a given, but no-one told me!)
Okay, enough tips for today - I do have more though, when you are ready. I have a strange urge to go stay at a Marriott - any clue why?
Posted by Tilly at 11:15 PM 2 comments
Labels: Decor Elements
Monday, July 7, 2008
You're my Mr. Wonderful!

Posted by Tilly at 7:30 PM 1 comments
Labels: 3-d projects
Sunday, July 6, 2008
Hope my brayered sky makes a big spash!
 Yep... another brayered sky attempt! I am still not happy with my previous attempts and I have some alone time today, so I am playing! This sky uses going gray, brocade blue and not quite navy. Obviously, your sky should match the "mood" of the card. This one, I wanted to incorporate rain clouds into (the clouds were made using the scallop punch) and it is probably a bit more blue than it should be, but practice make perfect, I guess. Once I got the rain clouds, I "saw" the bird with the umbrella from a little birdie told me, but I didn't want him under the rain clouds, so I stamped him walking towards the rain clouds and then found the puddles, rain drops and sentiment from Melanie Muenchinger (someday I'll learn how to spell that w/o looking) jumping for joy and just so hoppy sets. I know as a SU demo, I'm not supposed to, but I just LOVE her sets - they can be found here at Gina K Designs.
Posted by Tilly at 1:11 PM 0 comments
Labels: Non SU Cards
another brayered sky card for our anniversary
I'm still playing around with the brayered sky technique. It sure is harder than it looks to get a pretty "sky". This one will be DH's anniversary card. It's simple, yet pretty I think (like me - LOL!).
The colors I used on this sky were pretty in pink (can't wait to see the new pink pirrouette in-color), going gray and not quite navy. The flowers from garden silhouttes were stamped in black. The happiness is a rub on applied directly to black grosgrain ribbon. If you haven't tried that yet - do! It's so easy and it really gives a great effect! Have a great day and thanks for stopping by!
Posted by Tilly at 12:32 PM 0 comments
Labels: SU Cards
Friday, July 4, 2008
NEW SU scallop edge punch!
Hey everyone! I'm not lucky enough to have mine yet, but check out this video on Linda's blog featuring the new scallop edge punch that will be available on August 11th ($15.95). Oh, I can't wait to get mine! I also put a link in the really cool tutorials section on the right hand side of my blog.
Posted by Tilly at 3:25 PM 0 comments
Labels: Scallop Edge Punch
Thursday, July 3, 2008
favorite.... eer, wonderful husband
 Here's a quick one I made tonight for DH's upcoming birthday. It has a mish-mash of everything and it was kinda fun to make as there was really no pressure 'cause he doesn't know any better :) It's pretty self-explanatory and nothing special, but I think he'll get my humor in mistaking him for my favorite husband as we always joke with one another that we are each other's "favorite" husband/wife! Thanks for stopping by!
Posted by Tilly at 9:24 PM 0 comments
Labels: SU Cards
Wednesday, July 2, 2008
Brayered Sky - LIfe's a Breeze
I finally had time to stamp on my vacation! Yeah me! The boys had baseball practice and then went to a pool party for dinner, so I got to spend some quality alone time! This month's DIVA techniques will be brayered sky, so I'm playing around with it, so I can sound oh so knowledgeable (did I spell that right... LOL?) when teaching this fun technique. The black circle frame was an extra as a result of cutting the wrong sized circle with my coluzzle. The first one I cut was too big, so I laid the coluzzle back over the cut out circle and cut the smaller one from it and threw this piece in the scraps. After I had brayered the sky and found something (the sailboat from Life's a Breeze) to stamp over my sky, the black circle was what I grabbed when I went searching for a black scrap to mount the focal image on. Hope you like it! THanks for stopping by!
Posted by Tilly at 9:58 PM 1 comments
STAMPIN UP'S! NEW IN COLORS - SNEAK PEEK
Hi there!
Are you as excited to see the New Stampin Up! Catalog as I am? (it will be released and active August 11th). We demo's got to see a sneak peek yesterday on July 1st. The new in-colors are just a bit of the exciting news! I can't post them yet as I don't actually have them in hand. I will place my order later today and then wait 1-2 weeks for it's arrival, then I'll gladly share with you all, in the meantime, you can check out Dawn's blog by clicking here. She even has a great comparision for you.
Some other cool things coming in the new catalog are:
--all new sets will be die-cut
--There is a new long scallop punch that fits with the All Scallops stamp set on page 111!
--A cute sock money set - who loves sock monkey?
--cute new level 2 and level 3 hostess stamp sets, including a designer paper, rub-on, 4-stamp combo pack!
Hope this gives you enough info to satisify your cravings for a bit.... August 11th will be here soon - I hope! Have a great day.
Posted by Tilly at 5:52 PM 0 comments
Labels: SU Specials
Tuesday, July 1, 2008
Decor Elements are available!
Decor Elements can be ordered by customers starting TODAY!! I've put the link to the brochure back up on the sidebar to your right. I have received my pre-ordered Decor Elements and I must say, they are HUGE! I haven't "installed" them yet though. Anyway, these things are pretty cool and I've seen lots of demos using their pre-orders in all sorts of ways - some of the coolest (in my opinion) are:
--A Vespa Scooter (small motorcycle thingie)
--On a glass frame so the background paper could be changed out
--Over a plain doorway
--On a glass "coaster" thingy for candles
--On tinted car windows
--On a front door!
If you'd like to see these things "in action", check them out in the Splitcoast Galley under anything but a card, then home decor, then decor elements - they're way cool. I have hard copies of the brochure and if you'd like one, shoot me an email and I'll be sure to get you one. I will also be offering a 10% discount on your first decor element ordered... Just mention this post!
Posted by Tilly at 10:19 PM 0 comments
Labels: SU Specials


