CLICK HERE FOR THOUSANDS OF FREE BLOGGER TEMPLATES »

Thursday, March 25, 2010

It's a boy!!!

Yeah.... I'm an aunt again! My sister welcomed her new baby boy, Connor Daron into the world this morning - Happy Birthday Connor! He joins his big brother Adam and big sister Lexi at home. They are all represented in this card, lol - adam and lex as the 2 little monkeys and Connor as the sweet little giraffe. Congrats to Shannon and Shane on their new addition. This card uses the new fox and friends set from the Ocassions Mini, the cloud template that I love so much, a retired single stamp called Beautiful Baby and the naturally serif die.
Yesterday was my mom's birthday (she' staying with my sis right now for the birth) and we were really hoping that the baby would share a birthday with her... he almost made it too! They got to the hospital at 11:40 pm last night and Connor came at 12:07 am this morning! (yep, thats 27 minutes!!) Phew, that was close :) Apparently, my sis does NOT recommend an epidural-free birth though, lol. Thanks for stopping by today - if you're having a baby today - get the drugs!!


Thursday, March 18, 2010

a Bunny Box


It's almost time for easter! I subscribe to several blogs for ideas. This bunny box is one of those things that I saw on an email that I get when I subscribe to a blog and is a project that one blogger, Marie is doing for an upcoming class. I have a workshop coming up this weekend and open house at school tonight, so I thought I'd make 2 based on her picture... one for my hostess and one for the teacher. I took a pic of the pieces and the punches I used as I don't have time to compile a tutorial (sorry), but at least you can get an idea by the pictures. Pretty straight forward punching, shading and assembly. The only part you may need help with is the "box" part. When I decided to CASE (Copy and Share with Everyone) Marie, there was only a picture of this adorable box and no instructions as she hadn't held her class yet. When I make these boxes (like the Turkey one in a previous post) I use Tammy's tutorial found here. This little basic box will work with almost any top note creature you can come up with and is a good thing to keep as a reference! Have fun and Hoppy Easter!
ETA: Since my adaptation of Marie's bunny box, Marie has posted a wonderful tutorial on her blog -check it out here!


Thursday, March 4, 2010

Using SU Vinyl as decor

I wanted to add a quote over the french doors in my kitchen. So I pulled out my negelected Chocolate Vinyl from Stampin Up! and fired up my Cricut machine. It was more difficult than I anticipated to get the letters to stay uniform in size, but I like the overall affect. Not perfect, but hey, neither am I, lol!


Sorry for the bad pictures, I'm still struggling with my photo editing software. I can't edit any pictures, so whatever comes out of the camera is what I have to post here.


Saturday, February 27, 2010

1st Annual Redneck Regionals!


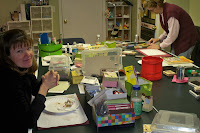
Well, the snow may have kept Stampin' Up! from us, but it didn't keep us from Stampin' Up! The Syracuse, NY Regionals was cancelled due to whether conditions (this is actually the day after so the driveway is MUCH clearer in this pic, but you still get the idea), but we didn't let that stop us from enjoying a day of stamping with friends. Prior to the Regionals, we had made plans to gather after Regionals to go to dinner and do some shoebox projects and swap 3 x 3 cards, so some of the girls just brought their shoebox projects here and we did a small 3 x 3 swap. Here are some pics from our day:


Wish we could have stamped all day, but I had to close the Rubber Room early to attend a hockey game in Auburn (east of Syracuse). I"ll post our very small (4 card) 3 x 3 swap later. Gotta shower for a hockey game! My son is playing for the Sectional Title and a chance to compete in the NY State Pee Wee Hockey Championship - stamp...eeer, wish us luck!

Thursday, February 25, 2010

A Sale-A-Bration Flier with My Digital Studio!


Hopefully you can click on this to see it better. If you are not on my mailing list and would like join it or for me to email you a copy, please contact me at tillyhead@roadrunner.com and I'll be happy to add you. If you would like to take advantage of my specials that day, but cannot attend, please let me know and we'll figure it out!
I created this flier using the new Digital Design Software from Stampin' Up! called My Digital Studio. Isn't it great? It has sooooo many stamp sets included - it's really a great value. Once I figure out all the tips and tricks, I'll be hosting classes! For those who purchase this software from me, some classes will be free! SAB is a GREAT time to get My Digital Studio - you'll earn a FREE stamp set!

Wednesday, February 24, 2010

SU Regionals - Syracuse, NY 2/26/10

I'm sooooo excited! Stampin' Up! is coming to Syracuse, NY! I've even heard rumor that Shelli Gardner (the co-founder of Stampin' Up!) might be there. This is an event for demo's or potential recruits and is a great opportunity to get tips, tricks and TONS of ideas to bring back to our customers. While there, you can take "swaps" to trade with other demos. I've made 64 cardfronts to trade with other demos, so I will be coming back with 64 brand new ideas to show all of you! The swaps have to be made using all current SU things - here's mine...

This one is made using the Baroque Motifs stamp set and the large solid petal from Pick A Petal (it's the carrot). The flourish on top of the carrot is from the Wings of Friendship set (a current hostess set). I made the lines in the carrot by running a stylus across the stamp before putting it to the paper.
This next one is my favorite! I got the I {Love} Love wheel from the Occasions Mini and cut it apart! This allowed me to use the words from the wheel in any combination that I wanted! There was a "I Love You" and a Heart to Heart sentiment, so I cut 'em up and combined them to form the I Heart You sentiment! The rest is pretty self explanatory. The great border punch is one that I got for FREE from the SAB catalog - ask me how!

This is a cardfront that I had made for another Demo meeting and I had extras of. The fun thing about this cardfront (I like to do at least one unexpected thing on a swap card) is that the brick wall behind the guitar player is a home-made (by my friend Linda Tarolli) stamp made by using leftover rectangles of rubber mounted on an extra block. Also, the silver "eyelets" are made by dipping a pen cap into the silver Shimerz paint!

And.... this adorable little fishy is a 3 x 3 card that will be my contribution to a swap after Regionals. A bunch of us are planning to get together for dinner and more stamping afterwards. The fish is made with the Delightful Decorations Stamp Set and the Ornament Punch (which, BTW is still available even though it was in the Holiday Mini) This is not my original idea, I saw it on a blog somewhere and had to make my own.


Monday, February 22, 2010

some more CNY * SNY swap peeks

Here's an over view group shot with table 3 (the best table, lol) in the foreground. Starting 0n the right and counterclockwise there is Diane H. (Diane617), Judy K (JudyK), Denise (DeMud), Jeanette K (JKinney) and LouAnn (CrookedStamper). What a nice table to spend the day with!
Diane WITHOUT a smirk on her face! Nice smile TOD!

The coveted Bunny Box. Jeanette brought this project made with the Stampin' Up! Fancy Favor Box - cute stuff!

Here are the ATC's I received from from the ATC swap. Some great additions to my binder!


some more CNY * WNY swap peeks

So I got to spend the day this past saturday stamping, chatting, laughing and eating (lots!) with my friends in Maine, NY. Here are some of the great projects that we did. The first pictures are of the "shoebox" projects that we did. A shoebox project is where you design a card or a quick project and prepare enough supplis for each person at your table to complete your project, then we rotate seats until we've done all the projects at our table. Fun Stuff!

The one on the left was designed by Diane (Diane617) and the easel card was by Denise (demud).
This gift card holder was designed by Judy (JudyK).

This coaster album was designed by a newbie to gatherings, Lou Ann (CrookedStamper). Great job Lou Ann!

Here's the coaster book open.

Here is a group shot of the Demo Quality Swaps I received. Mine is shown below (The chocolate bunny one.)


Friday, February 19, 2010

SNY * CNY Swap, Maine, NY Feb 20, 2010

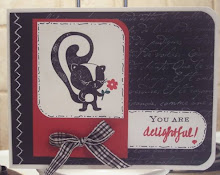
Yippee!!! It's time for another Shoebox Swap in Central New York! I will be heading to the Binghamton, NY area tomorrow to stamp with a great group of girls from all over the state. I'm kinda beat, so this will be short.... but this card will be my Demo Quality Cardfront swap.... And this one will be my shoebox project for The Bestest Table there.... #3!


And this little beauty will be my ATC swap. (sorry about the picture, something happened to my photo editing software when I installed updates on my computer.) Stay tuned....I'll be back later in the weekend to share some of the projects from this swap (and also some projects that I've put together for the upcoming Stampin' Up! Regionals being held in Syracuse, NY next week!


Thursday, February 11, 2010

Surprise Brian is turning 40!


So my good friend is turning 40 (finally, lol) and his wife and I made some invitations for his party. Aren't they cute? I used the movers and shapers die to cut the window out of the front and then popped the 40 up on foam dots (stampin Up! dimensionals are GREAT for this as they are nice and thin!) I cut the 40 out using my cricut machine. The cute little old guy is from the Stampin Up! set called Golden Oldies. We paperpieced his shorts and colored his polo shirt to match. Oh, the random words on the front panel were printed on my computer using different fonts. If you see Brian this week at hockey, be sure not to let him know about his surprise party!

Thursday, January 28, 2010

love bandit birthday card


Finally, I got a chance to play with some of my goodies from the mini! This card features the new set called Love Bandit and I'm lovin' that it's unmounted to use with my acrylic blocks. It sure made getting that squirrel onto the tree stump much easier! The cloud background is done using my handy little cloud template that I put together with oval and scallop cirlcle scraps. This is an idea that I saw on Patty Bennett's blog. The ballons are from the Itty Bitty Birthday set. Thanks for looking.

Tuesday, January 19, 2010

New Hartford Hockey headed to Michigan!

I found a use for all that leftover packing paper from my SU deliveries! Here I've used it as a base for a sign that I made for my son's ice hockey team. They won a regional tournament and are headed to compete for the finals in Michigan soon. I used my Cricut machine to cut each players' name and the big letters. I left it so that I could fold it down the middle for easy transport (hopefully). It got approval from the 12 yr. old as "not embarassing" so hopefully it will be okay to display it, lol!


I try not to do it often, but sometimes I just gotta brag on my kids a bit! These are pictures from our recent home travel hockey tournament. Both of my sons competed at different levels. The best thing about being the tournament director is that I get to hand out trophies and since my kids both got them this year, I get to give them a congratulatory kiss instead of a handshake like the other players all get. It's my special treat for all that hard work :) It's a family affair too - that's my hubby holding the box of trophies to be distributed. Wish us luck in michigan and when I get back I might have some some Mini Catalog samples to show you as I'll be taking some stamping on the road with me!