CLICK HERE FOR THOUSANDS OF FREE BLOGGER TEMPLATES »

Monday, May 24, 2010

graduation gift card holders

It's graduation time again! My co-worker needed some gift card holders, so I used the My Digital Studio softare to type in the name of the school and the class year, chose the color ink I needed to match the stamped images, copied and pasted and viola - a gift card holder! I printed a full sheet of paper and then used my Sizzix gift card holder die to cut them out. The stamped graduation caps are from the new set called Go, Graduate (Wood Mount $19.95 or Clear Mount $14.95) from the Summer Mini. Here's the inside of the holder. The gift card goes in the little pocket on the right. Here's the whole stack of them!

Thanks for stopping by!


Tuesday, May 18, 2010

My Digital Studio - Clear Mount DVD case insert

Today I have a fun MDS project to share! I've decided not to wood mount these stamps and instead, I'm storing them in one of Stampin' Up's! new plastic DVD style case. They all fit into one slim case - LOVE IT! The new clear mount stamps you get from Stampin' Up! come in these cases and have a great insert that shows the stamp images on the front and down the spine, so I created my own insert. I can't take all the credit though, I've seen some done on blogs and such, but I did import all my own images, and create my own margins, so I guess it's kinda mine, lol!Here is my first whack at it! I really was pretty easy once you fool with the margins and stuff. Now I have a template I can use for any future sets I decide to unmount. What do you think?


Saturday, May 15, 2010

doodle factory creatures

Today I have some cards that I made for a friend. She has the same goofy sense of humor as I do, so I know she'll love these kinda "off-color" cards. Please stop reading if you are easily offended!

I made a group of 10 cards using the Doodle Factory Critters (I and II). This first card features Zed who is new. I just love these little guys and I wish that I had gotten the whole new set at the recent stamping expo.


The inside of this card reads "may the simple pleasures be yours today and throughout the coming year". Don't cha just love him... he even has a little green fun flock booger :)

This is Snargle, I like him as he can be for a man or a woman!

The inside of this card reads: "I just wanted to give you a reason to celebrate a little longer" Happy Belated Birthday.
And below is the whole set of cards. They are all birthday cards and will be a birthday present for my goofy friend, lol! I hope you can click the picture to see them in detail.
And here's a shot of my workspace after my 10 cards in one day frenzy. Why do I always seem to end up with only 6 inches of space to work in...
Gotta go clean up the Rubber Room now! Thanks for stopping by - have a great weekend!

Wednesday, May 12, 2010

Red, White and Blue Wheel

Do you ever look at the wheels in the catalog and think, they're cute, but I never use the wheels once I have them. ME TOO! I've recently decided that I will not be afraid and I will cut apart my wheels....yes, CUT APART!!! I know it sounds scary, but look what can come of it! This is a card I made for a Summer Mini Catalog swap. It features the Red, White and Blue Jumbo wheel from the new Summer Mini. Below is a picture of the wheel cut apart, and stored in a CD case (although I may change to a SU DVD case now). This is the "inside" of the card. See the back of the star now? That is done using the movers and shapers die and the "half-cut ornament window" technique as shown on Dawn Olchefske's youtube channel. Cool, huh?

The jumbo wheel was carefully cut apart, tombo mono-multi adhesive applied and allowed to dry and then I just use these stamps on my clear blocks. I can even put them all back together (I'm good at puzzles, lol) on a large block if I want the "wheel" affect again. Another cool, huh?

Thanks for stopping by! I'll post my other swap card featuring Tropical Party tomorrow.

Saturday, May 8, 2010

WNY Spring Fest 2010 pictures

If you follow my blog, you probably remember me saying how excited I was to be able to attend the 3rd annual WNY (Western NY) Spring Fest held in Buffalo on May 1, 2010. This is a wonderful event, hosted by Tracy Harp. This year was the biggest year yet with over 100 stampers registering!! We were to make a "shoebox" project for our assigned table. A shoebox project is where you provide and cut all the materials for everyone at your table (usually 8-10) to make your project. Once you are at your assigned table, the projects get passed around and everyone does everyone else's project!... Fun Stuff!!!! This was my shoebox project. It features the Totally Tess set that was available in the Ocassions Mini. The sentiment on the panel reads "My husband told me if I'm gone one more night stamping, he'd leave me.... I'll miss him!" As part of the WNY Spring Fest, you are asked to sign up for at least one swap as well as bring a shoebox project. I signed up for the 6 x 6 recipe swap and the ATC (artist trading card) swap. I had to make 36 recipes....

And 32 ATC's...


I have some other pics from the day itself that I'll post over the next couple of days. Thanks for stopping in!

Friday, May 7, 2010

From invitaiton to card.....

When we have a wedding to attend, I really like to take the couple's wedding invitation and use pieces and parts to make their wedding card out of. Recently, we received this invitation to a wedding.....

I did some creative cutting, punching and stamping and this is what I came up with for the wedding card. It is a gatefold card with a "belly band". The black swirls are embossed and have tiny crystals on some of the dots. I also added two bigger crystals on the blue "A" mat after taking the picture. Their names are punched from the invitation with the word window punch and adhered to the front of the card.Here is the inside of the card. Again, the black is embossed. I realized after I was all done, that I didn't incorporate the ribbon at all.... maybe I can find a spot for it on the envelope. At least I know they will like the colors as they picked them, lol!


Tuesday, April 27, 2010

My Niece, the 2010 Dairy Princess


A little shout out to my niece, Nicole who was recently crowned the Madison Co. Dairy Princess - yeah Nicole! You are a great girl and I'm sure you'll represent the County well in your reign as Dairy Princess... We are all very proud of you! Isn't she beautiful...

And here's the card I made to congratulate her. It features a set names Anabelle designed by my friend Diane Zechman. I've had this set for quite awhile and have used it quite a bit as I grew up on a a dairy farm, so cows are near and dear to our hearts. Nicole now lives on the family farm as my brother (her father) took it over and runs it now with his wife. As I was making this card, I said to my husband... is it really bad that I haven't made a card for Nicole making National Honor Society yet, but I'm making her a Dairy Princess card?Hay (pun intended), we all have our priorities, right? I just know how hard Nicole worked and how much she wanted this title, so good job Ne-cole! We love you!

Saturday, April 24, 2010

Spartan Baseball Birthday Card


Well, it's baseball season again! Today marked the offical opening day of Little League here in New Hartford and another birthday party tonight! My son's travel baseball team-mate invited him to his birthday sleepover, so I of course had to make a card. I love that my kids' friends are expecting a special "Mrs. Moran" card, lol. My son wanted me to make his friend a "spartans" card. The t-shirt image is a stamp from TooMuchFun Rubber Stamps and really does come in handy with 2 sports maniacs as kids. I stamped the image in versamark and clear embossed, then colored in the fold lines with brilliant blue ink. Then I highlighted the trim with my white gel pen. I tried to cut the spartans baseball part with my cricut, but didn't have enough time (or patience) to continue, so I resorted to stickers and a hand cut swoosh thingy. I'm not sure if you can see or not, but I even added 2 "buttons" covered with crystal effects. The back was kept simple with letters cut with my serif alpha from Stampin up and more stickers for the #. When I was all done, I also covered a piece of white typing paper with coordinating stamps (used inside the card) and used that to wrap the gift (a movie sized box of candy and an i-tunes card). Hope he likes it! Thanks for peeking at my blog :)

Friday, April 9, 2010

Everything Nice

So I got a text tonight from my friend that she needed a baby card for a girl by Sunday. I came home and went to Splitcoast for some inspiration. I found this card by Kim and fell in love! I didn't have all the exact same punches, etc so I made a few alterations. As I got started, I realized that I didn't have the stamp set Everything Nice (Stampin' Up!) and thought that maybe it was one of the many that was included in My Digital Studio (Did you know that the program comes with over 60 stamp sets?!?) Anyway, this set wasn't one of them, so instead I used My Digital Studio to type in my own sentiment, printed it out and viola, a card was born! Thanks for stopping by today!

Thursday, April 8, 2010

Color Renovation at Stampin' Up!

As you've probably heard by now, Stampin' Up! is going through a renovation.... a Color Renovation. They have done extensive research and found that this cosmetic update is needed. In the process of the re-vamp, they have decided to discontinue 29 of our former core colors once the new catalog comes out on July 1 st. While I'm VERY excited to hear that some of our beloved old "in-colors" (like River Rock , Pink Pirrouette and Wild Wasabi) are returning to be part of the basic colors, I am a bit apprehensive about losing some of the current colors. So, for people like me who will miss certain colors (for me it's creamy caramel for my build a bear die and blush blossom for my punch art people's face, arms and legs), I have put together a paper share. There are 7 categories that each contain 4 colors of paper. Each share costs $6 and includes 6 sheets of each of the four colors for a total of 24 sheets. The groups are listed below as well as represented by their corresponding number on the color dot. I hope that you can click on the image to enlarge it... sometimes it works and sometimes it doesn't.

If you would like 1 (or many) spots in this color share, please email me at tillyhead @ roadrunner . com . If you are not local and would like to participate, just add $4.95 flat rate shipping per 3 shares.


p.s. Flyer created using My Digital Studio Software... lovin' this program!


Tuesday, April 6, 2010

Sweet Scoops - Sneak Peak

Ssssshhh.... this is a sneak peak of a new stamp set from Stampin' Up!'s Summer Mini. The mini goes live on May 1st. Because I'm a demo, I get to pre-order from mini so I can be all ready to show samples when it is open to the public. This set I actually earned for free for placing a qualifying order within 3 weeks of the regional that was supposed to be held in Syracuse, NY but was canceled due to snow (the drawback of living in CNY). This cute little set has the 2 cone types and hard and soft ice cream scoops as well as sprinkes, a cherry, a wood grain looking stamp that gives your hard scoop ice cream that striated look and the sentiment. I'm just realizing that I managed to use ALL the stamps from the set on this card.... yeah me! The darker green cone on the right is done by inking the solid hard scoop and then taking some ink off by stamping the un-inked texture stamp onto the inked ice cream scoop. The hard scoop ice cream on the left is what is left on the texture stamp after removing ink from the other cone. Confusing I know, but worth the effort of explaining I hope. What do you think?


Sunday, April 4, 2010

My Digital Studio - Pee Wee Hockey Scrapbook

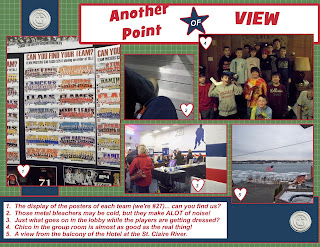
I have spent the better part of 3 days working on this digital scrapbook for my son's hockey team. They were an AMAZING group of kids this year and pretty darned good hockey players to boot! They participated in several important tournaments including our own Travel Tournament, a Thanksgiving International Invitational, A Northeast Regional qualifier and the Silver Stick International Finals in Michigan, Pre-Sectionals, Sectionals and ultimately the New York State Championships! Wow - how's that for a bit of a brag :) The scrapbook was made using My Digital Studio and is the first real project that I've done with it. It was so easy. A bit time consuming (83 pages), but that's because I didn't have all my stuff together and I had to scan a bunch of newspaper articles and clippings in. I've pulled a sampling of pages to show you here. The best part of this digital scrapbook is that when the players are viewing their copies, they can click on the "hot spots" and see the articles written about them! The program even has the ability to record (we read in some of the coaches emails) and add audio bytes as well as video bytes. Unfortunately, my video camera wasn't cooperative this weekend so that will have to be next year's scrapbook! Enjoy the pages and please let me know what you think! CLICK ON ANY OF THE PAGES TO SEE MORE DETAIL!

I'm bummed that the coach wears purple page got messed up during exportation. The fonts didn't transport, so it screwed up the placement. It is supposed to read "Our COACH rocks... even in PURPLE". It's one of my favorite pages. He obviously didn't know the reporter was coming to do a story on the (red and blue) team.


Note: These awesome photos were purchased and downloaded from http://www.myhometownsports.net/ articles Jeff Pexton at http://www.photoreflect.com/
Jeff does an awesome job covering local sports and highlighting them online. Thanks Jeff!


This page features grandma and grandpa with the "fatheats" that I made of my son and his friend (the goalie). Also pictured are the fans holding up their kids' heart during the game. Believe it or not, for playoff games, we are not allowed to bring noise makers to the arena. What kind of hockey is quiet?!?


Thursday, March 25, 2010

It's a boy!!!

Yeah.... I'm an aunt again! My sister welcomed her new baby boy, Connor Daron into the world this morning - Happy Birthday Connor! He joins his big brother Adam and big sister Lexi at home. They are all represented in this card, lol - adam and lex as the 2 little monkeys and Connor as the sweet little giraffe. Congrats to Shannon and Shane on their new addition. This card uses the new fox and friends set from the Ocassions Mini, the cloud template that I love so much, a retired single stamp called Beautiful Baby and the naturally serif die.
Yesterday was my mom's birthday (she' staying with my sis right now for the birth) and we were really hoping that the baby would share a birthday with her... he almost made it too! They got to the hospital at 11:40 pm last night and Connor came at 12:07 am this morning! (yep, thats 27 minutes!!) Phew, that was close :) Apparently, my sis does NOT recommend an epidural-free birth though, lol. Thanks for stopping by today - if you're having a baby today - get the drugs!!


Thursday, March 18, 2010

a Bunny Box


It's almost time for easter! I subscribe to several blogs for ideas. This bunny box is one of those things that I saw on an email that I get when I subscribe to a blog and is a project that one blogger, Marie is doing for an upcoming class. I have a workshop coming up this weekend and open house at school tonight, so I thought I'd make 2 based on her picture... one for my hostess and one for the teacher. I took a pic of the pieces and the punches I used as I don't have time to compile a tutorial (sorry), but at least you can get an idea by the pictures. Pretty straight forward punching, shading and assembly. The only part you may need help with is the "box" part. When I decided to CASE (Copy and Share with Everyone) Marie, there was only a picture of this adorable box and no instructions as she hadn't held her class yet. When I make these boxes (like the Turkey one in a previous post) I use Tammy's tutorial found here. This little basic box will work with almost any top note creature you can come up with and is a good thing to keep as a reference! Have fun and Hoppy Easter!
ETA: Since my adaptation of Marie's bunny box, Marie has posted a wonderful tutorial on her blog -check it out here!


Thursday, March 4, 2010

Using SU Vinyl as decor

I wanted to add a quote over the french doors in my kitchen. So I pulled out my negelected Chocolate Vinyl from Stampin Up! and fired up my Cricut machine. It was more difficult than I anticipated to get the letters to stay uniform in size, but I like the overall affect. Not perfect, but hey, neither am I, lol!


Sorry for the bad pictures, I'm still struggling with my photo editing software. I can't edit any pictures, so whatever comes out of the camera is what I have to post here.